Wow! I can't believe it's been 3+ years since I last posted on my blog.
I'm guessing I best get my hiney in gear and get some things posted!
What have I been doing since my last post? Well, I've been making cards, having a lot of fun with my family, fun with card clubs, traveling, and just basically enjoying life.
Stay tuned for some videos that I have made also. Now, why I didn't post my very first one, I don't know? It turned out pretty good, even if I do say so myself. And since then, I have done several. So, as soon as I find them, I will post them.
Thank you for your patience and putting up with my absence - but now? I'm baaack!
Have a blessed and safe day.
Love, hugs and happy stamping.
Becky
Saturday, March 21, 2020

Wednesday, September 28, 2016
September Craft Club
Oh my gosh, I have got the most creative friends. Wait until you see the lovely fall centerpieces they made. They all started out with the same pumpkins and embellishments. And just look at how they are all so different. Each one is uniquely beautiful like the ladies that made them.
This is the sample that I made, just to give them an idea of what they could expect. They just took this idea and ran with it, they are so amazing and talented.
Aren't they just beautiful? Thank you ladies for such a fun creative evening.
Thanks for stopping by. . .
 |
| Becky's sample |
This is the sample that I made, just to give them an idea of what they could expect. They just took this idea and ran with it, they are so amazing and talented.
 |
| Beth's |
 |
| Debbie D's |
 |
| Debbie S' |
 |
| Linda's |
 |
| Lynettes |
 |
| Marianne's |
 |
| Pam's |
 |
| Phyllis's |
 |
| Sherri's |
 | ||||
| And this is Arlene's |
Thanks for stopping by. . .
Thursday, September 15, 2016
September Stamp Club
Hello,
Here we are in September already. Can you believe how fast the summer went? Just too fast. But beautiful warm lovely weather.
Card club this month turned out to be a little warmer than we thought - Indian Summer? Maybe, but I think it's too early for that. So we made some fun fall cards in card club this month.
 Both of these cards used September Stamp of The Month 'Blessed Beyond', and a set of the mini stamps from our Create Kindness card kit. The card on the left is using the new color 'Emerald' along with some of our new Embossed acetate paper and some gold embossing. The leaves on the card on the right also have some gold embossing and lots of edge sponge distressing on the edges.
 This double flip card using the Jeepers Creepers paper pack shows how versatile this Halloween themed paper pack can be. The Gerber Daisy was cut from the new Flower Market cricut cartridge edged with the new color Raspberry. Word stamps from the September Stamp of the Month 'Blessed
Beyond'.
 And now for using the Jeepers Creepers paper pack for Halloween. The cute little monster on the left was cut from the Artistry Cartridge from two of our new colors Pansy and Willow. The moon behind him is cut from the new color Lemon. It also holds some yummy treats inside.
I love how these Halloween themed papers are so versatile.
Thank you for stopping by,
Happy Stamping
Here we are in September already. Can you believe how fast the summer went? Just too fast. But beautiful warm lovely weather.
Card club this month turned out to be a little warmer than we thought - Indian Summer? Maybe, but I think it's too early for that. So we made some fun fall cards in card club this month.


Beyond'.

I love how these Halloween themed papers are so versatile.
Thank you for stopping by,
Happy Stamping
Wednesday, August 3, 2016
Wow it has been a very long time since I took the time to write a little something on my blog! Been just a little crazy in my life. But that's pretty normal for me. You know "crazy"!
 We do have a new catalog out now! Yippee! the 2016 Annual Inspiration is live and lovely and just amazing! Notice all the tabs? Yep! It's that good!!!
I recently added on to my studio as well. . . I feel so blessed to have so much room to play in. It works perfectly for my clubs and team meetings. It is just what I wanted and now I can keep the club space clean and just mess up the other side!

Okay not to go off for a few days with the hubs!
Thanks for stopping by ~ Happy Stamping
 We do have a new catalog out now! Yippee! the 2016 Annual Inspiration is live and lovely and just amazing! Notice all the tabs? Yep! It's that good!!!
I recently added on to my studio as well. . . I feel so blessed to have so much room to play in. It works perfectly for my clubs and team meetings. It is just what I wanted and now I can keep the club space clean and just mess up the other side!

Okay not to go off for a few days with the hubs!
Thanks for stopping by ~ Happy Stamping
Friday, February 27, 2015
Studio Craft Club
Wow - I really need to get back into blogging again. I have been totally remiss on posting anything this year. I will certainly try to change that.
I started a new club "Studio Craft Club" I have been having a blast! We have been making items from Close To My Heart along with other miscellaneous items. A girls just gotta be crafty - right? I made wooden blocks that the ladies decorated with words "Fall, Fun, Family", "Live, Love, Laugh" etc - they were all just beautiful. One of the months we even made Snowmen! They were so adorable! And even though everyone has the same items to work with - no two projects are alike!
This month we used the Art Philosophy and Artiste cricut cartridges to make all types of flowers, rosettes, leaves, swirls, butterflies and banners to decorate grape vine wreaths. I have to tell you - I have the most creative friends. They all turned out amazing. Just check them out -


There were a few items left over after class - so what do you do with them!? Well, I need a spring wreath for my door and just look at them, sitting on the table telling me, no, challenging me to do my best with what was left. Well I do like a crafty challenge and all in all I think my wreath turned out pretty good with just leftovers. The only thing that I cut out to finish my wreath was the 'Welcome'.


I started a new club "Studio Craft Club" I have been having a blast! We have been making items from Close To My Heart along with other miscellaneous items. A girls just gotta be crafty - right? I made wooden blocks that the ladies decorated with words "Fall, Fun, Family", "Live, Love, Laugh" etc - they were all just beautiful. One of the months we even made Snowmen! They were so adorable! And even though everyone has the same items to work with - no two projects are alike!
This month we used the Art Philosophy and Artiste cricut cartridges to make all types of flowers, rosettes, leaves, swirls, butterflies and banners to decorate grape vine wreaths. I have to tell you - I have the most creative friends. They all turned out amazing. Just check them out -
Aren't they just gorgeous? I told you they were talented ladies.
There were a few items left over after class - so what do you do with them!? Well, I need a spring wreath for my door and just look at them, sitting on the table telling me, no, challenging me to do my best with what was left. Well I do like a crafty challenge and all in all I think my wreath turned out pretty good with just leftovers. The only thing that I cut out to finish my wreath was the 'Welcome'.
Thanks for stopping by ~
Happy Stamping/Crafting
Sunday, September 14, 2014
Stampers With an Attitude - Scaredy Cat - Blog Hop
This month Stampers With an Attitude are showing Scaredy Cat Artwork With an Attitude! This is a circular hop so if you have come from Jaimie's Blog blog you are right on track!
You are going to absolutely love this paper pack! The designs are fun, the colors bright and bold. You have no chance of making a card or scrapbook page that isn't fun!
 I made two very similar cards for this hop - only because when I turned the center portion of my card over to add the adhesive - I had cut the paper (unknowingly) in the perfect place! So I turned it back over and added the adhesive to the other side, and centered it on my card. It had the sweet little sentiment "By the Light of the Silvery Moon", (no need to add another), and the rustic fence! All I had to do was add the moon, bats and that cute little vampire! I love how this card turned out!
 After that happy accident - I had to go back to my original idea and make another card. I am happy to report the original idea turned out just as cute! The ladies in my card club really enjoyed making this card during class. They added 'glittery' bats, and colored their cute little vampires with the new 'ShinHan' markers - IF they wanted to. Did I tell you how much I love the new markers??? They are amazing!
I hope you have as much fun making your Halloween cards as I did - Scaredy Cat makes so easy!
Thanks for stopping by ~
Next on our circular hop is the wonderfully creative Fawn, be sure to hop on over and see her work! And don't forget to stop at all the creative blogs on this 'hop'!
Items used for these cute cards:
X7185B Scaredy Cat Paper Packet
Z3011 Scaredy Cat Assortment
C1522 Creepy Creatures (My Acrylix)
1385 White Daisy Cardstock
Z1906 Cricut Artbooking Collection
Z1829 Black and Gray Glitter Paper
Z2457 YR24 Marigold ShinHan Marker
Z2454 GY234 Leaf Green ShinHan Marker
You are going to absolutely love this paper pack! The designs are fun, the colors bright and bold. You have no chance of making a card or scrapbook page that isn't fun!
After that happy accident - I had to go back to my original idea and make another card. I am happy to report the original idea turned out just as cute! The ladies in my card club really enjoyed making this card during class. They added 'glittery' bats, and colored their cute little vampires with the new 'ShinHan' markers - IF they wanted to. Did I tell you how much I love the new markers??? They are amazing!I hope you have as much fun making your Halloween cards as I did - Scaredy Cat makes so easy!
Thanks for stopping by ~
Next on our circular hop is the wonderfully creative Fawn, be sure to hop on over and see her work! And don't forget to stop at all the creative blogs on this 'hop'!
Items used for these cute cards:
X7185B Scaredy Cat Paper Packet
Z3011 Scaredy Cat Assortment
C1522 Creepy Creatures (My Acrylix)
1385 White Daisy Cardstock
Z1906 Cricut Artbooking Collection
Z1829 Black and Gray Glitter Paper
Z2457 YR24 Marigold ShinHan Marker
Z2454 GY234 Leaf Green ShinHan Marker
Saturday, September 6, 2014
Happy September!
When you are growing up, everyone tells you that time will go faster as you get older! Did I believe them?? Not one bit! How could time go faster?? Summers were already too short and fast! School started sooner than we wanted and the carefree days of summer - just gone!!! Gone too fast!! And before you know it, it's September!
Can you believe it's September??
Again - where did the summer go??
Again - gone too fast!
But now it's September!
Beautiful September! The perfect month. Beautiful warm days with just a hint of cool in the background. Cool nights - perfect for sleeping! The mornings and evenings are perfect for sitting on the patio and just enjoying the time!
Thanks for stopping by ~ Enjoy your September!
Can you believe it's September??
Again - where did the summer go??
Again - gone too fast!
But now it's September!
Beautiful September! The perfect month. Beautiful warm days with just a hint of cool in the background. Cool nights - perfect for sleeping! The mornings and evenings are perfect for sitting on the patio and just enjoying the time!
Thanks for stopping by ~ Enjoy your September!
Monday, August 18, 2014
August Craft Club
Oh my gosh - we are going to have so much fun at this months Craft Club!! This club night is the last Wednesday of every month at 6pm. Each month we do something fun and different that our usual cards and scrapbooking! So if you are looking for something new - come and join us! We have so much fun.
Here is a little tease of what is going on this month! Let me know if you would like to join us!
As you know it's all in the packaging! We all love to surprise our friends and loved ones with little gifts, and we can make these gifts just that much more with some special packaging!
All gifts need something fun and different to be delivered in, right? And this month we will make some fun gift boxes, bags, tags, etc etc... some will be hand made (you will need your score board), some made from cricut cuts (Artiste and Art Philosophy) and some. . . well some need to be a surprise!
Thanks for stopping by!
Happy Stamping!
Here is a little tease of what is going on this month! Let me know if you would like to join us!
As you know it's all in the packaging! We all love to surprise our friends and loved ones with little gifts, and we can make these gifts just that much more with some special packaging!

All gifts need something fun and different to be delivered in, right? And this month we will make some fun gift boxes, bags, tags, etc etc... some will be hand made (you will need your score board), some made from cricut cuts (Artiste and Art Philosophy) and some. . . well some need to be a surprise!
Thanks for stopping by!
Happy Stamping!
Sunday, August 17, 2014
August Card Club
Wow it was fun to see everyone after taking a month off to take care of family things and take some family time! We took the grandchildren, son and daughter-in-law to the beach for a few days! I had so much fun! I hope they did too!
 But getting back to my routine is nice - and I missed all my friends! With a slightly different format beginning with the new Close to My Heart Annual Inspiration (wow!!! I love the new idea book!) we started by learning a new technique, and reviewing one that we had done before.
These techniques will be done and/or reviewed each month and put on a "Technique Ring", then if anyone (including me) feels the need for some inspiration you can go to your 'ring' and choose one. I do have to thank my friend Adel for this wonderful idea. She is awesome for sharing this idea and letting me 'case' it! (copy and share w/everyone).
Our first technique (bottom) was the new 'painter tape' technique. Isn't it great?? And super easy, just use it like a stamp! The second is sanding on a dry embossed surface. Just as easy as it sounds!
Now for the cards we made with these two techniques.

 Using the painter's tape with new colors Flaxen, Pixie and Thistle, adding a sweet sentiment and some cute black dot flowers then matted it with black. I love this quick easy and fun card.
The dry embossing was done on Lagoon cardstock and with our white core it looks amazing sanded. Diagonally cut the dotted 'Seaside' paper and layer it on top. For a little contrast we used Thistle ink to stamp the sentiment on the circle (keeping with the dot format) and tied a cute bow on the side with the new Thistle diagonal stripe ribbon.
The third and fourth cards didn't really use any specific technique but they were equally fun to make!

Both of these cards were made using the Pathfinding paper pack. What a wonderfully versatile paper pack. The card on the left is what I like to call a 'tucker' card. It is small enough to 'tuck' into a coat pocket, a lunch box, a suitcase. . . well you get the idea! And yet it is big enough you could mail it if you wanted. Finished size is 3 1/2 x 3 1/2. And - check out that cute little staple in the upper corner! Fun little accent!
 And What a Hoot!! Our August Stamp of the Month!! Isn't it a hoot? So Adorable! After stamping and cutting him out he was matted on white cardstock that was distressed and sponged along the edges. Along with some Shimmer tape and sequin eyes on his mask he makes an adorable little card.
Thank for stopping by!
Items used in the making of these cards:
Z1924 Dot Embossing folder
X5762 Lagoon cardstock
X7192B Seaside paper pack
X7186B Pathfinding paper pack
Z1990 Thistle Diagonal stripe ribbon
B1467 My Acrylix You Mean the World to Me
Z2640 Thistle ink pad
Z2642 Flaxen ink pad
Z2644 Pixie ink pad
Z2641 Glacier ink pad
D1616 My Acrylix Have a Happy Day
B1462 My Acrylix Lovely Birthday
S1408 August Stamp of the Month - What a Hoot!
Z2012 Gold sequins
Z2449 Cerulean Blue Shinhan marker
Z2461 Peacock Green Shinhan marker
Z2465 Turquois Blue Shinhan marker
But getting back to my routine is nice - and I missed all my friends! With a slightly different format beginning with the new Close to My Heart Annual Inspiration (wow!!! I love the new idea book!) we started by learning a new technique, and reviewing one that we had done before.These techniques will be done and/or reviewed each month and put on a "Technique Ring", then if anyone (including me) feels the need for some inspiration you can go to your 'ring' and choose one. I do have to thank my friend Adel for this wonderful idea. She is awesome for sharing this idea and letting me 'case' it! (copy and share w/everyone).
Our first technique (bottom) was the new 'painter tape' technique. Isn't it great?? And super easy, just use it like a stamp! The second is sanding on a dry embossed surface. Just as easy as it sounds!
Now for the cards we made with these two techniques.
Using the painter's tape with new colors Flaxen, Pixie and Thistle, adding a sweet sentiment and some cute black dot flowers then matted it with black. I love this quick easy and fun card.The dry embossing was done on Lagoon cardstock and with our white core it looks amazing sanded. Diagonally cut the dotted 'Seaside' paper and layer it on top. For a little contrast we used Thistle ink to stamp the sentiment on the circle (keeping with the dot format) and tied a cute bow on the side with the new Thistle diagonal stripe ribbon.
The third and fourth cards didn't really use any specific technique but they were equally fun to make!
Both of these cards were made using the Pathfinding paper pack. What a wonderfully versatile paper pack. The card on the left is what I like to call a 'tucker' card. It is small enough to 'tuck' into a coat pocket, a lunch box, a suitcase. . . well you get the idea! And yet it is big enough you could mail it if you wanted. Finished size is 3 1/2 x 3 1/2. And - check out that cute little staple in the upper corner! Fun little accent!
And What a Hoot!! Our August Stamp of the Month!! Isn't it a hoot? So Adorable! After stamping and cutting him out he was matted on white cardstock that was distressed and sponged along the edges. Along with some Shimmer tape and sequin eyes on his mask he makes an adorable little card.Thank for stopping by!
Items used in the making of these cards:
Z1924 Dot Embossing folder
X5762 Lagoon cardstock
X7192B Seaside paper pack
X7186B Pathfinding paper pack
Z1990 Thistle Diagonal stripe ribbon
B1467 My Acrylix You Mean the World to Me
Z2640 Thistle ink pad
Z2642 Flaxen ink pad
Z2644 Pixie ink pad
Z2641 Glacier ink pad
D1616 My Acrylix Have a Happy Day
B1462 My Acrylix Lovely Birthday
S1408 August Stamp of the Month - What a Hoot!
Z2012 Gold sequins
Z2449 Cerulean Blue Shinhan marker
Z2461 Peacock Green Shinhan marker
Z2465 Turquois Blue Shinhan marker
Saturday, August 2, 2014
Thank you - Thank you - Thank you!
Just playing around and finally getting my thank you cards done and sent after 3 months!!!! But my mom always told me - it is never too late to send a Thank You card - so I am holding her to that!
Just some simple CAS cards - Clean And Simple!

'Thank you so much' is made using some of the new colors; Flaxen and Canary with a little Honey thrown in along with some new Gold Sequins!
'Thank you for your kindness' is made with a retired paper pack (sorry) and the ever popular bling!
The circular 'thank you' card is made using the new Seaside paper pack and using the new color Glacier!
'Thanks a Bunch' is made with the new color Thistle, the new epoxy stars and the black striped ribbon -
Thanks for stopping by ~ Happy Stamping
Just some simple CAS cards - Clean And Simple!
'Thank you so much' is made using some of the new colors; Flaxen and Canary with a little Honey thrown in along with some new Gold Sequins!
'Thank you for your kindness' is made with a retired paper pack (sorry) and the ever popular bling!
The circular 'thank you' card is made using the new Seaside paper pack and using the new color Glacier!
'Thanks a Bunch' is made with the new color Thistle, the new epoxy stars and the black striped ribbon -
Thanks for stopping by ~ Happy Stamping
Convention Cards
What a fun time at convention this year! I just love Disneyland! And what a wonderful place to have a convention? Right? Fun Fun Fun!!!
This year I was blessed to help at one of the creative sessions! I was so excited when I got my email! My Mike asked if I was okay because I was just giddy! What fun! What an honor!
One of my friends got to help at a later one and we both agreed it was extremely hard to keep our secret, because we couldn't show anyone!!! Yikes - you all know how hard it is for me to keep quiet!
So here are the cards! They are made with our new upcoming Cricut cartridge Artfully Sent! It is all about cards. Sad part is (Provo Craft) the booklets won't be ready therefore the cartridge won't be available until September! So sad, but will totally be worth the wait! Now without further ado . . .
 The cards are primarily based on a 5x7 format. I can hardly wait to play around with it and see what they will be like at the standard 4.25x5.5 size! and here you also see one of the new colors - Flaxen! Amazing new basic color! I Love It!
 YES the design is cut into to front of the card and you can back with any color you want! Here are two more new colors used, Canary and Glacier! Really nice new colors, aren't they?
The last card is just downright fun, isn't it? Again the words are cut out of the front of the card as well as the clouds on the inside panels with the pop-up balloon! Just add a little stamping some blingy embellishments and voila - your card is done ~ As soon as our cartridge is available club members will be making this card!


Thanks for stopping by ~ Happy Stamping
This year I was blessed to help at one of the creative sessions! I was so excited when I got my email! My Mike asked if I was okay because I was just giddy! What fun! What an honor!
One of my friends got to help at a later one and we both agreed it was extremely hard to keep our secret, because we couldn't show anyone!!! Yikes - you all know how hard it is for me to keep quiet!
So here are the cards! They are made with our new upcoming Cricut cartridge Artfully Sent! It is all about cards. Sad part is (Provo Craft) the booklets won't be ready therefore the cartridge won't be available until September! So sad, but will totally be worth the wait! Now without further ado . . .
The cards are primarily based on a 5x7 format. I can hardly wait to play around with it and see what they will be like at the standard 4.25x5.5 size! and here you also see one of the new colors - Flaxen! Amazing new basic color! I Love It!YES the design is cut into to front of the card and you can back with any color you want! Here are two more new colors used, Canary and Glacier! Really nice new colors, aren't they?Thanks for stopping by ~ Happy Stamping
Sunday, July 13, 2014
Stampers With An Attitude Bling it On!
Welcome to Stampers With an Attitude's monthly Blog Hop! This month it is all about the bling! Something that is near and dear to my heart - and art!!!
Every one will be showing their best 'Bling it Up Artwork with an Attitude'! Because that's just the way we are! Blingy!!!
This month they are trusting me (of all the blingy people!) to start this hop! However if you started in the middle of this hop you have come from Denise Elliott's and you are on the right track.
Those of you who watch my blog know that I am mostly a card maker - but - I wanted to try something a little different this month. I wanted to make something for each of my children, something they could use (or not) inside or outside, but pretty - so this is what I came up with.

I used the base and bling rings and made these darling napkin rings. The Kraft container holds extra napkins for the table. The roses were made with texture embossed paper and the swirls and hearts from the gorgeous glitter paper. And yes there is a red glitter gem in the center of each rose. Just a little glittery bling added to the 'blingy' glitter paper.

I am sorry to say my camera quit working, at of all times - convention - so these pictures were taken with my phone, I really hoped the glitter from the paper and the center of the flower would show up better - guess I better buy an new camera!
The next blingin' blogger on this hop is Di Crawford check out her bling!
Thanks for stopping by ~
Happy Stamping!
Every one will be showing their best 'Bling it Up Artwork with an Attitude'! Because that's just the way we are! Blingy!!!
This month they are trusting me (of all the blingy people!) to start this hop! However if you started in the middle of this hop you have come from Denise Elliott's and you are on the right track.
Those of you who watch my blog know that I am mostly a card maker - but - I wanted to try something a little different this month. I wanted to make something for each of my children, something they could use (or not) inside or outside, but pretty - so this is what I came up with.
I used the base and bling rings and made these darling napkin rings. The Kraft container holds extra napkins for the table. The roses were made with texture embossed paper and the swirls and hearts from the gorgeous glitter paper. And yes there is a red glitter gem in the center of each rose. Just a little glittery bling added to the 'blingy' glitter paper.
I am sorry to say my camera quit working, at of all times - convention - so these pictures were taken with my phone, I really hoped the glitter from the paper and the center of the flower would show up better - guess I better buy an new camera!
The next blingin' blogger on this hop is Di Crawford check out her bling!
Thanks for stopping by ~
Happy Stamping!
Wednesday, June 11, 2014
June Card Club
Oh my we had such a good time at card club this month! It was so good to see everyone! Sometimes these months go so slow and seems forever before I see my friends! I love them all so much.

I just wanted to share a few of the cards we made this month! I really made them work! They are all very patient with me and my card ideas!
Don't you just love the Jubliee (X7181B) paper pack??? There are so many options with this paper! Here is the one we did!
Their cards actually had a red ribbon with a yellow circle where mine is blue, and they used some of the red gingham paper instead of the zip strip. They were so much prettier. But I do like mine too!

This fun little birthday card is what I refer to as a 'tucker'! It is small, 3 1/2" x 3" finished size. Just the right size to tuck in a gift bag, tuck in your husband or child's lunch box, or a jacket pocket or even a suitcase!!! Therefore the name "tucker".
I hope you can see the chevron pattern on both the white and the red paper. They were put in the embossing folder in different directions to give it a little different dimension. And of course the sanding makes the white core stand out.

This is one of my favorites. We used the chevron stamp from the hostess set 'Doodle Signs', and the use of only three colors.
I put the colors together for them, every two ladies used the same colors (out of the 12 of them, six cards had the same two colors). The trim behind the strip of chevrons was their choice, but did match one of their ink colors. They also got to chose which color to stamp 'Friend' in.
All the cards were a little different and all just beautiful.
 And last but not lease - using the June Stamp of the month 'Kaboom' they made this darling round card. Again they sanded the red embossed cardstock to make it look like the stripes of the flag and to make the stars stand out.
What wonderfully creative ladies they are.
Thanks for stopping by, I hope you enjoyed our cards!
I just wanted to share a few of the cards we made this month! I really made them work! They are all very patient with me and my card ideas!
Don't you just love the Jubliee (X7181B) paper pack??? There are so many options with this paper! Here is the one we did!
Their cards actually had a red ribbon with a yellow circle where mine is blue, and they used some of the red gingham paper instead of the zip strip. They were so much prettier. But I do like mine too!
This fun little birthday card is what I refer to as a 'tucker'! It is small, 3 1/2" x 3" finished size. Just the right size to tuck in a gift bag, tuck in your husband or child's lunch box, or a jacket pocket or even a suitcase!!! Therefore the name "tucker".
I hope you can see the chevron pattern on both the white and the red paper. They were put in the embossing folder in different directions to give it a little different dimension. And of course the sanding makes the white core stand out.
This is one of my favorites. We used the chevron stamp from the hostess set 'Doodle Signs', and the use of only three colors.
I put the colors together for them, every two ladies used the same colors (out of the 12 of them, six cards had the same two colors). The trim behind the strip of chevrons was their choice, but did match one of their ink colors. They also got to chose which color to stamp 'Friend' in.
All the cards were a little different and all just beautiful.
What wonderfully creative ladies they are.
Thanks for stopping by, I hope you enjoyed our cards!
Sunday, May 11, 2014
Stamper's With an Attitude - Free To Be Me Blog Hop!
Happy Mother's Day and welcome to the Stampers With an Attitude's - National Scrapbooking Month's Free to Be Me Artwork With an Attitude Blog Hop.If you have come from the super creative Jen Patrick's blog you are on the right track.
The Stampers with an Attitude are excited to show artwork using the May National Scrapbooking Month Special 'Free to Be Me'! This paper pack is so fun! And it works perfectly with the My Acrylix Stamp set "Feathers" such a natural pairing! It looks really good with the May Stamp of the Month "You've Got A Friend" stamp set too! But I won't show all of the cards I made on this hop - I want some of them to be a surprise for my 'card clubs'! I hope these will inspire them to be creative and be Free To Be - Them!
Although I won't show all of the cards I am going to share a couple of my creations (actually two versions of one card).
This shows the difference between pastel and vibrant versions of the same card - I made the pastel one first then decided I wanted to see what it would look like in brighter colors. I'm not sure which one I like better?


Thanks for stopping by - now hop on over to Jaime Llewellyn's blog and check out her amazing art work.
Have fun and 'hop' on!
All items used in making these cards are Close to My Heart:
Card #1:
Free to be me paper pack - yours for only $5 with a qualifying purchase
My Acrylix Feathers - C1584
Colonial White Cardstock - 1388
Sunset Ink Pad - Z2191
Lagoon Ink Pad - Z2195
Durables Triangle Studs - Z1928
Card #2:
Free to be me paper pack - yours for only $5 with a qualifying purchase
My Acrylix Feathers - C1584
White Daisy Cardstock - 1385
Sunset Ink Pad - Z2191
Lagoon Ink Pad - Z2195
Ruby Ink Pad - Z2170
Durables Triangle Studs - Z1928
Tombow Tape Runner - 1514
The Stampers with an Attitude are excited to show artwork using the May National Scrapbooking Month Special 'Free to Be Me'! This paper pack is so fun! And it works perfectly with the My Acrylix Stamp set "Feathers" such a natural pairing! It looks really good with the May Stamp of the Month "You've Got A Friend" stamp set too! But I won't show all of the cards I made on this hop - I want some of them to be a surprise for my 'card clubs'! I hope these will inspire them to be creative and be Free To Be - Them!
Although I won't show all of the cards I am going to share a couple of my creations (actually two versions of one card).
This shows the difference between pastel and vibrant versions of the same card - I made the pastel one first then decided I wanted to see what it would look like in brighter colors. I'm not sure which one I like better?
Thanks for stopping by - now hop on over to Jaime Llewellyn's blog and check out her amazing art work.
Have fun and 'hop' on!
All items used in making these cards are Close to My Heart:
Card #1:
Free to be me paper pack - yours for only $5 with a qualifying purchase
My Acrylix Feathers - C1584
Colonial White Cardstock - 1388
Sunset Ink Pad - Z2191
Lagoon Ink Pad - Z2195
Durables Triangle Studs - Z1928
Card #2:
Free to be me paper pack - yours for only $5 with a qualifying purchase
My Acrylix Feathers - C1584
White Daisy Cardstock - 1385
Sunset Ink Pad - Z2191
Lagoon Ink Pad - Z2195
Ruby Ink Pad - Z2170
Durables Triangle Studs - Z1928
Tombow Tape Runner - 1514
Sunday, January 12, 2014
Stampers With an Attitude January Blog Hop!
Welcome to the Stampers with an Attitude January Blog Hop! If you have come from the ever creative Melinda Everitt's blog you are on the right track. The Stampers with an Attitude are
excited to show artwork using Close to My Heart Washi tape and one of our stamp
sets, so here we go.
Washi tape is one of the newest and biggest ideas for decorating your cards, scrapbook pages and just about anything you want to decorate. Washi tape has been out for a while and the designs are really beautiful! I love stamping and using our (CTMH) background and texture papers, therefore until lately I have just set aside the Washi tape, I just wasn't sure?! So, after Christmas I decided to just jump right in and go for it! Then - along came the Stampers with and Attitude's blog challenge for January using Washi tape!!! Coincidence??? Hmmmm ~ Either way it's working out perfect for me. And - by jove - I think I've got it!! I love Washi tape!!
Most all of the cards for my card clubs are KISS friendly, and FUN!
I wanted to design a card using Washi tape - and surprise them with a card that doesn't have my usual B&T paper designs. I hope they like it - so simple and FUN - the most important thing when it comes to creating.

The Washi tape I used for this card are ~ Silver Geometric (Z1932), Slate Polka Dot (Z1817) and the Lagoon Washi tape is from the Holidays from the Heart Collection which is no longer available, I had this card made before the end of the year. Using Art Philosophy I cut out a tag for the sentiment and attached it with Slate Bakers Twine. The Congrats stamp is from the Artiste stamp collection. I hope this shows you how easy it is to use Washi tape and how beautiful it makes your designs.
I will now send you on your way to the next blogger ~ Sheila Bennett you will love her design.
Thanks for stopping by ~
Washi tape is one of the newest and biggest ideas for decorating your cards, scrapbook pages and just about anything you want to decorate. Washi tape has been out for a while and the designs are really beautiful! I love stamping and using our (CTMH) background and texture papers, therefore until lately I have just set aside the Washi tape, I just wasn't sure?! So, after Christmas I decided to just jump right in and go for it! Then - along came the Stampers with and Attitude's blog challenge for January using Washi tape!!! Coincidence??? Hmmmm ~ Either way it's working out perfect for me. And - by jove - I think I've got it!! I love Washi tape!!
Most all of the cards for my card clubs are KISS friendly, and FUN!
I wanted to design a card using Washi tape - and surprise them with a card that doesn't have my usual B&T paper designs. I hope they like it - so simple and FUN - the most important thing when it comes to creating.
The Washi tape I used for this card are ~ Silver Geometric (Z1932), Slate Polka Dot (Z1817) and the Lagoon Washi tape is from the Holidays from the Heart Collection which is no longer available, I had this card made before the end of the year. Using Art Philosophy I cut out a tag for the sentiment and attached it with Slate Bakers Twine. The Congrats stamp is from the Artiste stamp collection. I hope this shows you how easy it is to use Washi tape and how beautiful it makes your designs.
I will now send you on your way to the next blogger ~ Sheila Bennett you will love her design.
Thanks for stopping by ~
Sunday, November 10, 2013
Stampers with an Attitude Blog Hop! Gratitude with Attitude!
Welcome to the Stampers with an Attitude Blog Hop! The blogger in
front of me is Angela Garcia.
The Stampers with an Attitude are excited to show you our Gratitude with an Attitude artwork , so here we go.
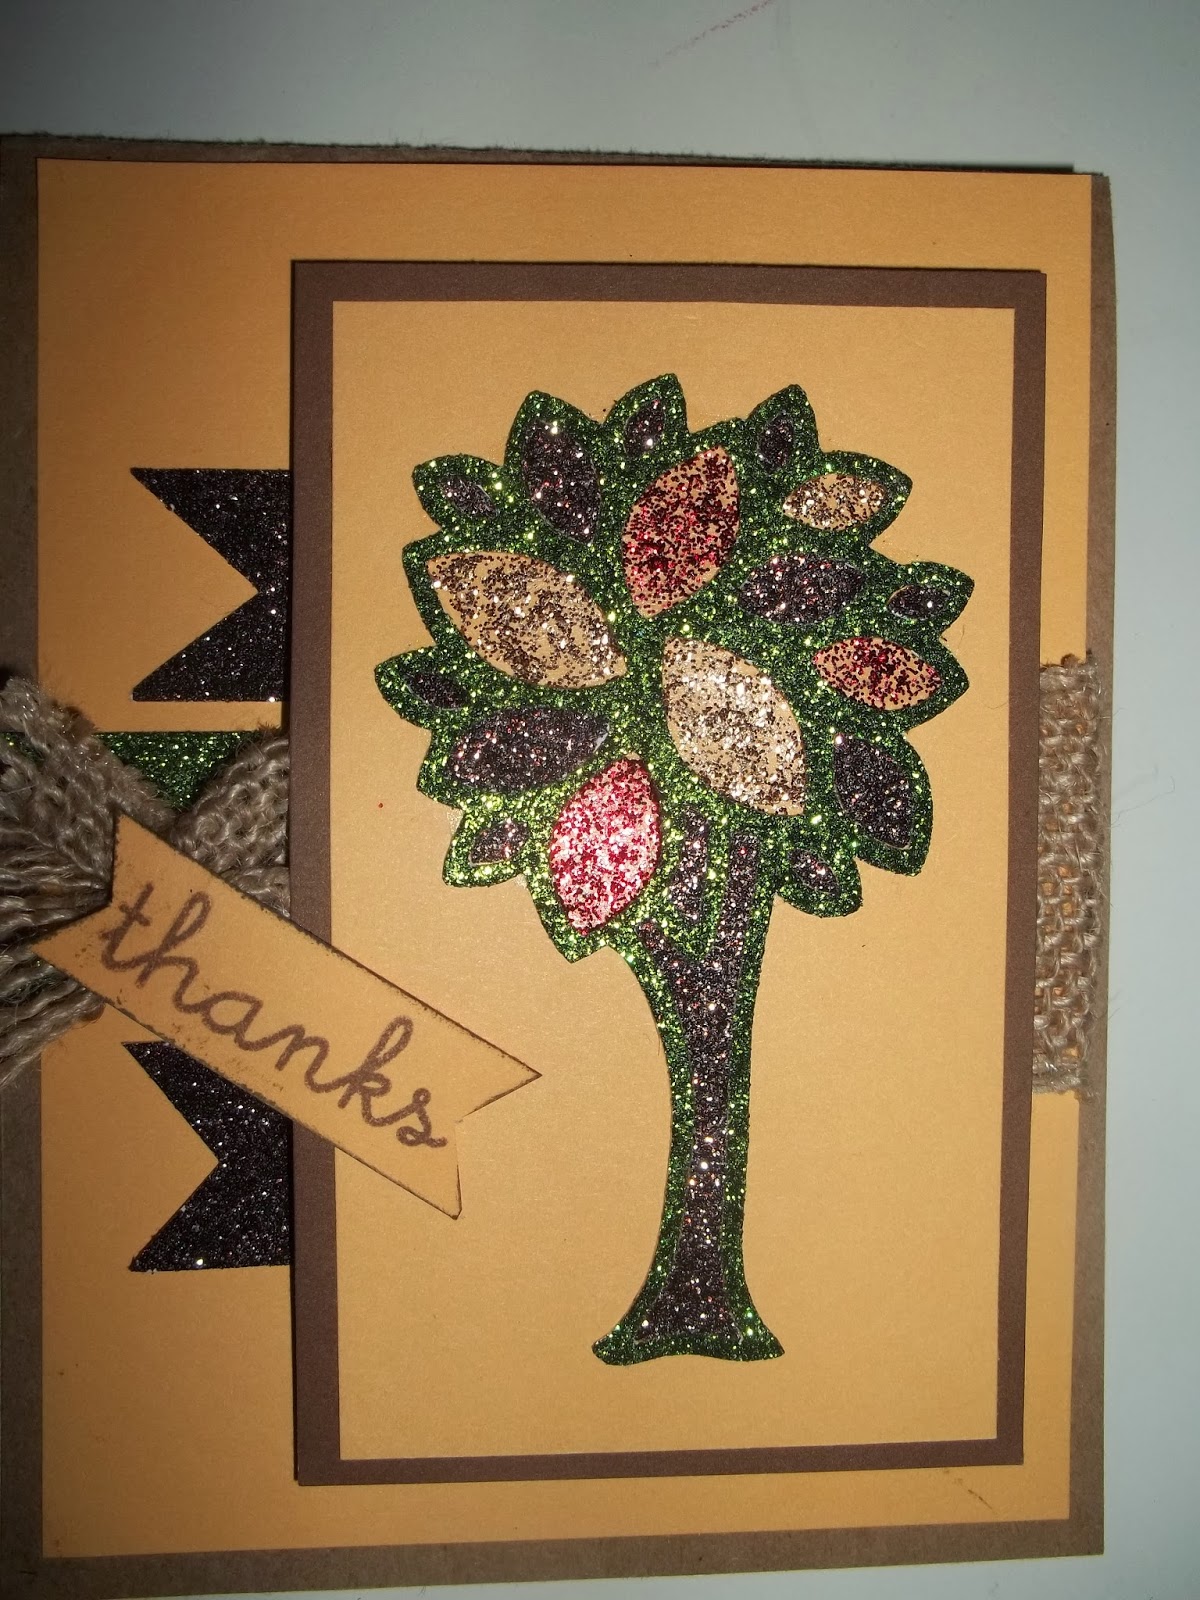
My card was inspired by the scrapbook cover on page 130 the Close to My Heart 2013 Fall and Winter Idea Book.
 Using our new Artbooking Cricut cartridge (Z1906) I cut out the awesome tree shown on page 72, using the Brown and Tan (Z1830) and Green (Z1847) glitter papers. The trunk and some of the leaves from the Bronze glitter tree were used to fill in the trunk and some of the leaves. The remaining leaves were filled using Red Glitter Gel (Z1484) and Almond Glitter Gel (Z1769). Saddle (X5928) was used for the card base and Creme Brulee (X5754) is the accent color.
I love the contrast between the Burlap Ribbon (Z1760) and all the 'Glitter' on this card.
The next blogger on the hop is Sandra VanWoerden
Have fun and Thanks for stopping by ~
The Stampers with an Attitude are excited to show you our Gratitude with an Attitude artwork , so here we go.
My card was inspired by the scrapbook cover on page 130 the Close to My Heart 2013 Fall and Winter Idea Book.
I love the contrast between the Burlap Ribbon (Z1760) and all the 'Glitter' on this card.
The next blogger on the hop is Sandra VanWoerden
Have fun and Thanks for stopping by ~
Tuesday, October 29, 2013
Card Club Christmas
Wow!!! Just a little late posting last months Card Club cards. October is always a good time to start thinking about what type and style of Christmas cards you want to make. We had a lot of fun making these cards and we even listened to Christmas carols to help put us in the mood.
Three of our cards were made using Close To My Heart's beautiful Frosted paper pack. All cards were made so they can easily be mailed with no extra postage.
 Add some bling and Christmas is almost ready.
Making the card on the left, a colonial white base was used and layered with Cashmere and Frosted Turquoise cardstock along with Frosted B&T paper. The stamped images using Glory to God (D1483) were stamped in Cashmere and Champagne inks. This turned out to be the perfect color combination for this stamp set and paper pack for this card.
 The tag that we made shown to the right, is also made with CTMH Frosted paper pack. The tag itself was made using CTHM's Artiste Cricut cartridge (pg 35), first cut at 4" in Colonial White and then cut at 3 3/4" for the B&T paper. Embellished with the B&T zip strip around the middle, swirl bling and HO HO HO stamped from the Perfect Fit - Holidays (B1412)stamp set and cut out using the 1 1/4" circle punch (Z1311). My club members used the Silver Shimmer Trim in the center to give the tag more sparkle and shine.
 I was very happy how this beautiful Classy Doily 'snowflake' card turned out. Using the center gate fold the 'snowflake' was stamped with Twilight ink on the Colonial White cardstock piece cut from the Cricut Artiste (pg 56). On separate pieces of colonial white the centers were again stamped in Cashmere and Twilight then fussy cut. The pieces were then stacked using foam tape to give it dimension. Small Clear Sparkles were added on each layer to make it look like ice crystals on the snowflake.
 I couldn't leave out the wonderful Sparkle and Shine paper pack released in the 2013 Holidays from the Heart Gift Guide.
Using the Art Philosophy cartridge a 4 1/4" Scalloped circle was cut from Ruby cardstock, a 4" circle card (White Daisy) and a 3 3/4" circle from Sparkle and Shine B&T paper. The trees and banner were cut using the Artiste Cartridge. 'o christmas tree' was stamped using an older CTMH stamp set (not available this year) but does show you how to curve the words to fit the banner. The bow topper was made cutting the Ruby Chevron Ribbon ribbon in half and just tying in a knot. Super easy, super cute.
 And last but not least - you can't leave out Santa!
I saw this darling card on Pinterest and just had to re-create it for my club ladies.
This top fold card is made using Cranberry cardstock. The fur on Santa's suit was made cutting the belly band of a card on the Artiste cartridge (pg 71). The center heart was cut out leaving two equal parts that were embossed with an Anna Griffin embossing folder.
The belt buckle and buttons were cut using the Silver glitter paper. The belt and outer portion of the buttons are punched from black cardstock.
The tag was cut from White Daisy cardstock using the Art Philosophy cricut cartridge and stamped with Santa's Greeting using Cranberry ink with black hemp.
I hope these cards inspire you to make your own Christmas cards.
I would love to show you how and help get you inspired.
Thanks for stopping by!
Items used making of these cards:
Paper and Card Stock: Stamp Sets:
Frosted Paper Pack (X7175B) Classy Doily (B1424)
Colonial White Cardstock (1388) Glory to God (D1483)
White Daisy Cardstock (1385)
Cranberry Cardstock (1272) Stamp Pads:
Black Cardstock (1386) Cashmere (Z2175)
Ruby Cardstock (X5927) Twilight Stamp Pad ( Z2160)
Cranberry Stamp Pad (Z2116) Twilight ink (Z2160)
Accessories and Embellishments:
Cricut Artiste Collection (Z1790) Cricut Art Philosophy Collection (Z1686)
Sparkle Clear Flourishes Small (Z1812) Clear Sparkles (Z1752)
Sparkle and Shine Paper Pack (X7176B) Silver Glitter Paper (Z1829)
Black Hemp (Z3282) Ruby Chevron Ribbon (1846)
Three of our cards were made using Close To My Heart's beautiful Frosted paper pack. All cards were made so they can easily be mailed with no extra postage.

Making the card on the left, a colonial white base was used and layered with Cashmere and Frosted Turquoise cardstock along with Frosted B&T paper. The stamped images using Glory to God (D1483) were stamped in Cashmere and Champagne inks. This turned out to be the perfect color combination for this stamp set and paper pack for this card.
 The tag that we made shown to the right, is also made with CTMH Frosted paper pack. The tag itself was made using CTHM's Artiste Cricut cartridge (pg 35), first cut at 4" in Colonial White and then cut at 3 3/4" for the B&T paper. Embellished with the B&T zip strip around the middle, swirl bling and HO HO HO stamped from the Perfect Fit - Holidays (B1412)stamp set and cut out using the 1 1/4" circle punch (Z1311). My club members used the Silver Shimmer Trim in the center to give the tag more sparkle and shine.
 I was very happy how this beautiful Classy Doily 'snowflake' card turned out. Using the center gate fold the 'snowflake' was stamped with Twilight ink on the Colonial White cardstock piece cut from the Cricut Artiste (pg 56). On separate pieces of colonial white the centers were again stamped in Cashmere and Twilight then fussy cut. The pieces were then stacked using foam tape to give it dimension. Small Clear Sparkles were added on each layer to make it look like ice crystals on the snowflake.
 I couldn't leave out the wonderful Sparkle and Shine paper pack released in the 2013 Holidays from the Heart Gift Guide.
Using the Art Philosophy cartridge a 4 1/4" Scalloped circle was cut from Ruby cardstock, a 4" circle card (White Daisy) and a 3 3/4" circle from Sparkle and Shine B&T paper. The trees and banner were cut using the Artiste Cartridge. 'o christmas tree' was stamped using an older CTMH stamp set (not available this year) but does show you how to curve the words to fit the banner. The bow topper was made cutting the Ruby Chevron Ribbon ribbon in half and just tying in a knot. Super easy, super cute.

I saw this darling card on Pinterest and just had to re-create it for my club ladies.
This top fold card is made using Cranberry cardstock. The fur on Santa's suit was made cutting the belly band of a card on the Artiste cartridge (pg 71). The center heart was cut out leaving two equal parts that were embossed with an Anna Griffin embossing folder.
The belt buckle and buttons were cut using the Silver glitter paper. The belt and outer portion of the buttons are punched from black cardstock.
The tag was cut from White Daisy cardstock using the Art Philosophy cricut cartridge and stamped with Santa's Greeting using Cranberry ink with black hemp.
I hope these cards inspire you to make your own Christmas cards.
I would love to show you how and help get you inspired.
Thanks for stopping by!
Items used making of these cards:
Paper and Card Stock: Stamp Sets:
Frosted Paper Pack (X7175B) Classy Doily (B1424)
Colonial White Cardstock (1388) Glory to God (D1483)
White Daisy Cardstock (1385)
Cranberry Cardstock (1272) Stamp Pads:
Black Cardstock (1386) Cashmere (Z2175)
Ruby Cardstock (X5927) Twilight Stamp Pad ( Z2160)
Cranberry Stamp Pad (Z2116) Twilight ink (Z2160)
Accessories and Embellishments:
Cricut Artiste Collection (Z1790) Cricut Art Philosophy Collection (Z1686)
Sparkle Clear Flourishes Small (Z1812) Clear Sparkles (Z1752)
Sparkle and Shine Paper Pack (X7176B) Silver Glitter Paper (Z1829)
Black Hemp (Z3282) Ruby Chevron Ribbon (1846)
Subscribe to:
Posts (Atom)